CodeRush Code Embeddings Options
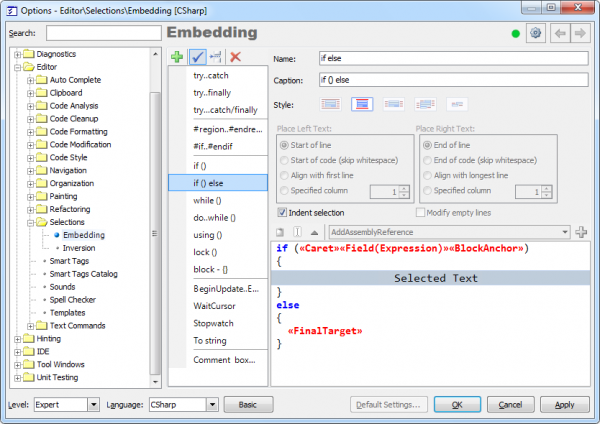
The Embeddings options page allows you to customize or remove the predefined CodeRush Code Embeddings and create your own for any registered language. The options page is located at the Editor | Selections | Embeddings path inside the CodeRush Options Dialog. Here is what is looks like:
It consists of two parts:
- The list of predefined code embeddings on the left with a toolbar at the top
- Options for the selected code embedding on the right
In the list, you can see embeddings defined for the selected language. Items in the list can be grouped together by using a separator. Embeddings will also be grouped the same way in the code editor context menu, for example.
There are four buttons on a toolbar at the top of the list:
- New Embedding – adds a new embedding item over the currently selected embedding in the list
- Visible on menu – toggles the visibility of the embedding item in the editor context menu or the Embed Selection code provider. You can still perform hidden embedding using the keyboard shortcuts.
- Begin group – begins grouping of the selected embedding item in the list. A group separator is inserted above the selected embedding item.
- Delete – removes the embedding item from the list
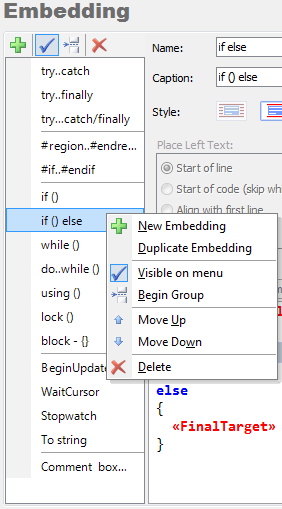
The list of available code embeddings also has a context menu:

It has the same items as the toolbar, along with a few additional items:
- Duplicate Embedding – creates a copy of the currently selected embedding item in the list
- Move Up – moves the selected embedding item one position up in the list and user UI
- Move Down- moves the selected embedding item one position down in the list and user UI
Now, the embedding item parameters are on the right of the options page. You can change the following settings for the selected code embedding:
- Name – the name of the code embedding is used to access this specific embedding, e.g. when you create a new shortcut for it.
- Caption – the display name of the code embedding is used in the UI, such as: the editor context menu and the Embed Selection code provider.
- Style – the style of the code embeddings. The following styles are available:
|
Icon |
Description |
|
|
Surround the selected text. The text is placed at the top, bottom, and on the left and on the right of the selection. |
| Top and/or bottom of the selected text. The text is placed above and below the selection. | |
| Left and/or right of the selected text. The text is placed to the left and to the right of the selection (each line of the selection gains a prefix and a suffix). | |
| Unique text is inserted at the start and end of the selected text, with repeating text added to the left and right to each line in the middle of the selection. | |
| The text is placed in front of and immediately after the selection. |
After the style settings, there are settings for the left and right text positions:

Available settings are:
- Start of line – place the text at the start of a line
- Start of code (skip whitespace) – place the text right before another text (code) skipping the whitespace characters
- Align with first line – align the text with the text of the first selected line
- Specified column [X] – place the text at the specified column (starting from 1)
Next, there are two checkboxes:
![]()
- Indent Selection – specifies whether an indent is added before the embedded text
- Modify empty lines – specifies whether empty lines, as well as lines containing a text, are modified. If unchecked, empty lines are ignored and not wrapped at all.
The code embedding itself is edited in the corresponding area at the bottom of the right part of the options page. You can see the Selected Text bar and type the text above, below, on the left, or on the right of the bar, depending on the selected Style option. This area has a toolbar with several helper buttons and a combobox that allows you to choose and insert another text command:
![]()
The buttons on the toolbar insert widely-used text commands:
- Paste from clipboard – inserts the Paste text command into the embedding editing area that will paste the contents of the Clipboard when this code embedding is applied
- Place caret – inserts the Caret text command into the embedding editing area that moves the caret to the specified position when this code embedding is applied
- Drop marker – inserts the Marker text command into the embedding editing area that drops a blue marker at the specified location when this code embedding is applied
The combobox and the Plus [+] button to the right allow you to choose any other registered text command that will participate in the code embedding expansion once it is applied.
To learn more on how to add your own code embeddings, please read the appropriate topic.
—– Products: CodeRush Pro Versions: 11.1 and up VS IDEs: any Updated: Sep/13/2011 ID: C131