IDE Tools (CodeRush) Shortcuts options page
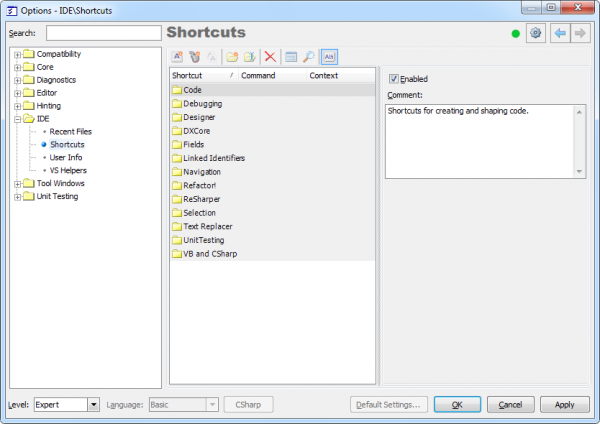
The Shortcuts options page is an important and one of the most often used options pages. It allows you to create, modify and remove shortcut bindings for all IDE Tools products (CodeRush, DXCore, Refactor!). The page is located at the IDE | Shortcuts path in the CodeRush Options Dialog. Here is what it looks like:
Shortcuts can be bound to keyboard strokes or mouse buttons. When creating a mouse shortcut you can use the left, right, middle, wheel and browse buttons in combination with shift key (Ctrl, Alt, Shift). Mouse shortcuts are available only when the code editor has focus. Keyboard shortcuts, on the other hand, are available anywhere in the Visual Studio IDE.
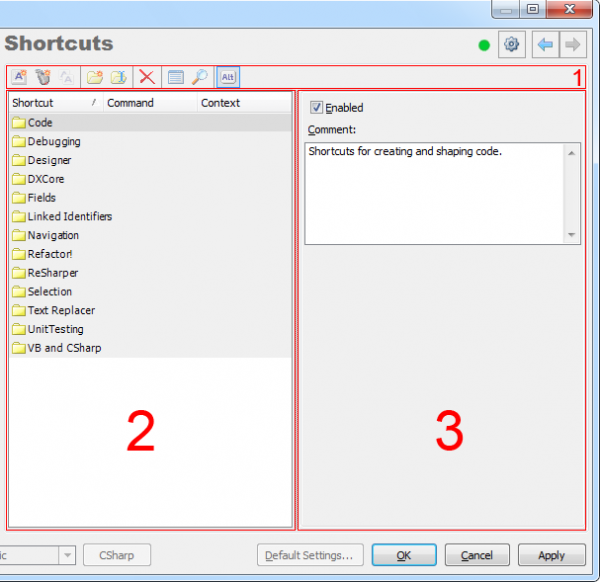
There are three main parts of the options page:
- A toolbar with a several useful buttons at the top
- The list of existing shortcuts with a couple of information columns on the left
- A panel with available options on the right when an item in the list is selected
Let’s take a closer look at each part.
Shortcuts List (#2)
All shortcuts are grouped into the folders in the shortcuts list. Every folder may specify an area for which shortcuts are defined, e.g. Navigation, Selection, Unit Testing, and others. Some folders specify the product with dedicated shortcuts, e.g. DXCore, Refactor!. You can create your own folders, and modify (rename) or remove existing ones.
A folder is expanded by a single mouse click on its icon or a double clicking its name. Once expanded, you can see the sub-folders and shortcuts that are defined in this folder. The sub-folders may contain other sub-folders and additional shortcuts. Such structure is created to better organize numerous IDE Tools shortcuts.
A shortcut item in the shortcuts list on the left has three columns:
- Shortcut – a key or mouse binding that will execute the specified command once pressed or clicked. Note that you can have several shortcuts with the same key binding that will perform different or identical commands.
- Command – the name of a command (an action name) that is being performed once the key binding is executed. Note that you can have several shortcuts bound to the same command name with different or identical key bindings.
- Context – the context in which the key binding is valid and available. To learn more about contexts, please read an appropriate topic – Contexts Overview. Note that you can have several shortcuts bound to the same key binding or command name but perform differently, depending on the context set.
The shortcuts list has a context menu that replicates most of the toolbar buttons and adds a few others:
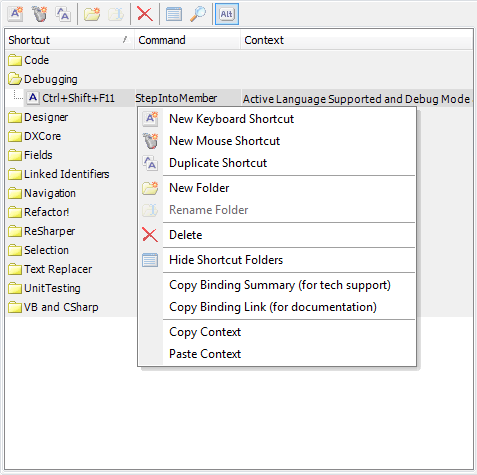
Here is an overview of the context menu items:
|
Icon |
Has toolbar button |
Item name |
Description |
| |
|
New Keyboard Shortcut | Adds a new keyboard shortcut to the current shortcuts folder. |
| |
New Mouse Shortcut | Adds a new mouse shortcut to the current shortcuts folder. | |
| |
Duplicate shortcut | Creates a copy of the selected shortcut. Note that this menu item is disabled if there is no shortcut selected. | |
| |
New Folder | Opens the New Folder dialog where you can specify the name of a new folder and its location or cancel folder creation. The dialog will not let you create a folder when the folder with the same name already exists. | |
| |
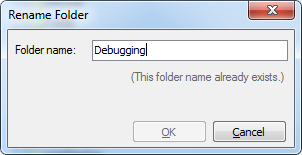
Rename Folder | Opens the Rename Folder dialog where you can specify a new name for the current folder. If no folder is selected, the corresponding menu item is disabled. The dialog will not let you specify the name of a folder when the folder with the same name already exists. | |
| |
Delete | Removes the current shortcut or an entire folder with all shortcuts inside, depending on the selected item (whether it is a folder or a shortcut). | |
| |
Hide Shortcut Folders | Hides all folders and shows all shortcuts in a plain list. | |
| |
Show Shortcut Folders | Restores the folder structure once the folders were hidden. This menu item is hidden if folders were not hidden. | |
| Collapse Folders | Collapses all folders to their definition, so its shortcuts are not visible. Note that this menu items is only available when you click a folder and not a shortcut. | ||
| Copy Binding Summary (for tech support) | Generates the most important information about the selected shortcut and copies it to the Clipboard. The information includes the following data: binding type (keyboard or mouse), the binding itself, command name, command parameters, comments, context, etc. | ||
| Copy Binding Link (for documentation) | Generates a command name tag for documenting it in the User Guide and copies it into the Clipboard. | ||
| Copy Context | Copies the context of the selected shortcut, so it is easier to initialize the context for new or similar shortcuts. | ||
| Paste Context | Initializes the context of the selected shortcut to the previously copied one. This is a handy function, allowing you to specify the context for a new shortcut based on the context of others. |
Here are what the New Folder and the Rename Folder dialogs mentioned in the table look like:
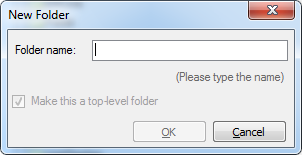
(Note: If the “Make this a top-level folder” checkbox is unchecked, the folder will be created as a sub-folder of the currently selected folder; otherwise, it will be a root folder)
and
Toolbar (#1)
As you can see, almost all of these functions are also available on the toolbar located at the top of the page. However, the toolbar has two additional buttons that do not exist in the context menu:
 – Find
Opens the Find dialog which allows you to find an existing shortcut or a folder. The dialog has four tabs where you can specify different parameters for the dialog:
1) Folder:
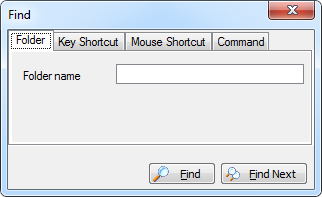
Here you can specify a folder name.
2) Key Shortcut:
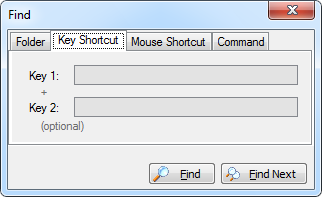
Here you can specify a key binding for a shortcut.
3) Mouse Shortcut:
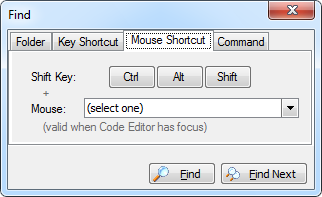
Here you can specify a mouse button and a shift key for the shortcut.
4) Command:
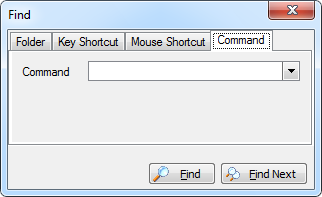
Specify a command name or choose it from the list, to find the corresponding shortcut if one exists.
The dialog has two buttons at the bottom: Find and Find Next. The Find button searches for the first occurrence of a shortcut, and the Find Next button allows you to search for other shortcuts with the same parameters.
 – Distinguish between left and right “Alt” (only for keyboard shortcuts)
Toggles an option to differentiate between the Alt (left Alt) and Alt Gr (right Alt) buttons. If enabled, both Alt keys will be treated as an Alt key, otherwise, the two Alt keys will be treated as different buttons. According to the caption of this option, it works only for keyboard shortcuts.
Shortcuts Settings (#3)
Now let’s see the options panel on the right side of the Shortcuts options page. If you have a folder selected, there are two options available (see the screenshot at the top of this article):
- Enabled, which specifies the availability of all shortcuts in the folder
- Comment, where you can specify a comment for a folder
If you have a keyboard shortcut selected in the shortcuts list, the options panel will look similar to this:
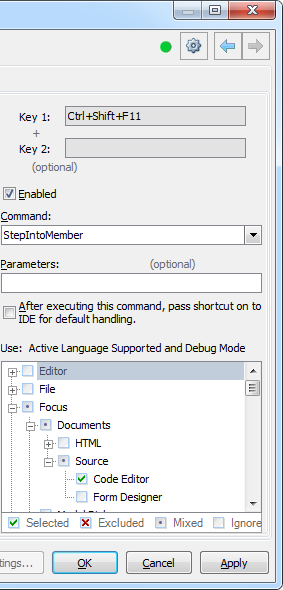
On the top you can assign a key binding for a shortcut in the Key1 and/or Key2 fields. Press the keyboard sequence in the Key1 field to assign a key binding. The Key2 field allows you to specify a second part of a key binding. For example, you can specify the “Ctrl+T” keystroke as a Key1 and the “R” key as a Key2 – this will create a “Ctrl+T,R” shortcut when you will have to press the Ctrl+T first and then the R key immediately to execute a command.
For the Mouse shortcuts the panel fields will look a bit different. For such shortcuts, you can select a Shift Key and the mouse button from the list:
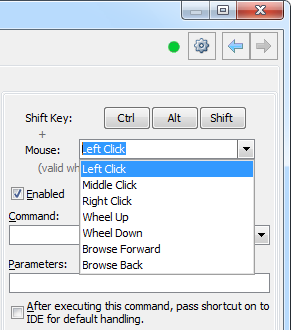
The Enabled option specifies whether the shortcut is available in the Visual Studio IDE. If it is not enabled, then the key binding will not do anything.
The Command combobox allows you to specify or choose a command name for a shortcut. Choose a command (an action) name and specify its parameters in the next field if required. Parameters are useful for commands that require them. For example, you can specify a refactoring name as a parameter to the Refactor command. This will apply the specified refactoring once the key binding is performed.
Next, the “After executing this command, pass shortcut on to IDE for default handling” option. This option specifies whether or not to send the performed key binding to the Visual Studio IDE. If unchecked, the key binding will perform a command and will not send a key to the IDE, so IDE will not intercept the key press and will not perform any actions bound to the same key binding.
Note, that if you assign both keys for a shortcut (in Key1 and Key2 areas) the “After executing this command, pass shortcut on to IDE for default handling” option will be checked and you will not be able to change it (it becomes disabled). This is, probably, a limitation of the current product version: you can not create a double-key shortcut and not have it passed on the command to the Visual Studio IDE. This is how the Shortcuts Engine is designed – if the Engine does not pass a second key to the IDE and perform an action bound to a shortcut, then Visual Studio IDE will not get a second keystroke and it will stay in the “Waiting for second key of chord…” mode until you press something. That is why the check box “After executing this command, pass shortcut on to IDE for default handling” is disabled and ticked if you specify a second key.
After all options for a shortcut, there is a context picker that allows you to specify a context for a particular shortcut.
When a shortcut is created and executed, and it has a conflict with the Visual Studio IDE shortcuts, you will see the Feature UI dialog that allows you to choose the default action to be performed in the future: whether the CodeRush shortcut or a Visual Studio one will be performed by default.
You can read the following shortcuts-related articles, to learn more on how to create shortcuts:
How to assign a shortcut key to a particular action
How to assign a separate shortcut to a particular refactoring
—– Products: CodeRush, Refactor! and DXCore Versions: 11.1 and up VS IDEs: any Updated: Aug/30/2011 ID: T048