How to use DXCore SmartTagProvider control and create your own Popup menu entry
Here’s what the standard Refactor!/Code! and “Jump to” Popup menu looks like:
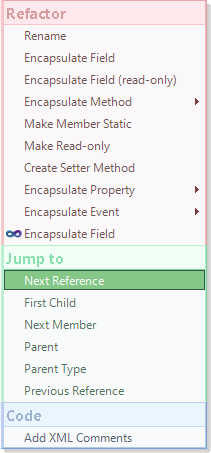
Let’s add an additional entry into this menu. For example, we’ll create a new My Favorites menu entry and add there a few useful actions. The SmartTagProvider DXCore component is suitable for implementing this task. Here are the steps we need to accomplish:
- Create a standard DXCore plug-in
- Drop the DXCore SmartTagProvider control on the plug-in’s design surface
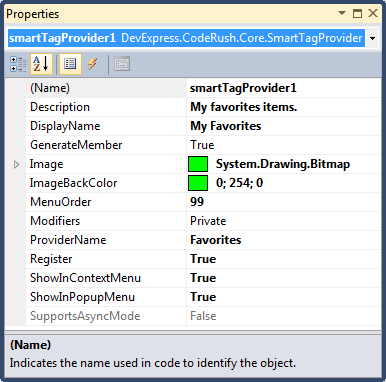
- Initialize the following properties of the new control:
- ProviderName = “My Favorites“ (or according to your preference)
- Desciption = “My favorites items.“ (or according to your preference)
- MenuOrder = 99 (or according to your preference)
- ShowInContextMenu = True
- ShowInPopupMenu = True
- Subscribe to the following events of the SmatTagProvider control:
- CheckSmartTagAvailability
- GetSmartTagItemColors
- GetSmartTagItems
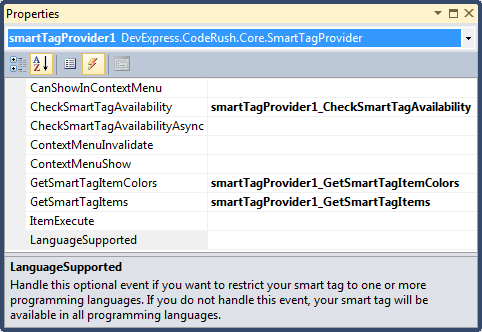
Now we should implement the logic of the SmartTagProvider control. The items of the provider must implement the ISmatTagItem interface. Our items will contain action items, so we need to create a wrapper that will implement the ISmartTagItem interface. Here are the methods and properties of the interface:
|
Method Name |
Description |
| Execute | Executes the smart tag item. |
| GetContextString | Gets the smart tag item context string. The context string is used to control the position of the item in the popup menu. |
| GetSubMenuItem | Returns the sub menu item by the given name. |
| GetSubMenuItems | Returns the sub menu items for the smart tag item. |
| HidePreview | Hides the smart tag item preview. |
| SelectMenuItem | Selects the specified smart tag menu item in the popup or context menu. |
| ShowPreview | Shows the preview hint for this smart tag item. |
Properties:
| Property Name | Description |
| Caption | Gets the smart tag item caption. |
| HasSubMenuItems | Gets the value which specifies if the smart tag item has sub menu items. |
| HintCaption | Gets the smart tag item hint caption. |
| HintText | Gets the smart tag item hint text. |
| Image | Gets or sets the bitmap image for this smart tag item. Item images are optional, but can be useful for displaying in the context menu. |
| ImageBackColor | Gets or sets the image background color for this smart tag item. It is used to determine which color is to be treated as transparent in the bitmap assigned to the Image property. |
| ItemType | Gets the smart tag item type. |
| Name | Gets the smart tag item name. |
| Provider | Gets or sets smart tag provider. |
| TransparentBitmap | Gets the transparent bitmap image for this smart tag item. This property is a replacement for the Image and ImageBackColor properties. |
Our wrapper will take a name of an action in the constructor, and the final code will look similar to this:
class ActionSmartTagItem : ISmartTagItem
{
  private DevExpress.CodeRush.Core.Action _Action;

  public ActionSmartTagItem(string actionName)
  {
    _Action = CodeRush.Actions.Get(actionName);
  }

  #region ISmartTagItem Members

  public string Caption
  {
    get
    {
      return _Action != null ? _Action.ActionName : String.Empty;
    }
  }

  public void Execute()
  {
    if (_Action != null)
      _Action.DoExecute();
  }

  public string GetContextString()
  {
    return String.Empty;
  }

  public ISmartTagItem GetSubMenuItem(string name)
  {
    return null;
  }

  public ISmartTagItem[] GetSubMenuItems()
  {
    return null;
  }

  public bool HasSubMenuItems
  {
    get { return false; }
  }

  public void HidePreview(Rectangle rectangle)
  {

  }

  public string HintCaption
  {
    get
    {
      return _Action != null ? _Action.ActionName : String.Empty;
    }
  }

  public string HintText
  {
    get
    {
      return _Action != null ? _Action.Description : String.Empty;
    }
  }

  public Bitmap Image { get; set; }
  public Color ImageBackColor { get; set; }

  public SmartTagItemType ItemType
  {
    get { return SmartTagItemType.Default; }
  }

  public string Name
  {
    get { return _Action != null ? _Action.ActionName : String.Empty; }
  }

  public SmartTagProviderBase Provider { get; set; }

  public void SelectMenuItem(ISmartTagItem item)
  {

  }

  public void ShowPreview(Rectangle rectangle, out Rectangle[] rectangles, out HintSurface legend)
  {
    rectangles = new Rectangle[0];
    legend = null;
  }

  public void ShowPreview(Rectangle rectangle)
  {

  }

  public TransparentBitmap TransparentBitmap
  {
    get { return null; }
  }

  #endregion
}
Then, we need to implement the appearance of the SmartTagProvider – define the colors for the Popup menu. The CodeRush Color Picker allows changing colors easily and quickly. Here we need to implement the abstract SmartTagPopupMenuColors class like this:
class FavouritesPopupMenuColors : SmartTagPopupMenuColors
{
  readonly Color _MenuTextColor = Color.FromArgb(0x55, 0x71, 0x71);
  readonly Color _MenuBackgroundColor = Color.FromArgb(0xBF, 0xDC, 0xFF);
  readonly Color _MenuSelectedTextColor = Color.FromArgb(0xff, 0xff, 0xff);
  readonly Color _MenuSelectedBackgroundColor = Color.FromArgb(0x6E, 0x7D, 0xC7);
  readonly Color _MenuSelectedBorderColor = Color.FromArgb(0x2E, 0x42, 0x58);
  readonly Color _MenuBorderRightOuterColor = Color.FromArgb(0x7D, 0x9F, 0xD7);
  readonly Color _MenuBorderRightInnerColor = Color.FromArgb(0xB2, 0xC8, 0xE8);
  readonly Color _MenuBorderLeftOuterColor = Color.FromArgb(0xC3, 0xDD, 0xF0);
  readonly Color _MenuBorderLeftInnerColor = Color.FromArgb(0xBA, 0xC6, 0xEE);
  readonly Color _MenuBorderTopColor = Color.FromArgb(0xBA, 0xEE, 0xEC);
  readonly Color _MenuBorderBottomColor = Color.FromArgb(0x7D, 0xA7, 0xD7);
  readonly Color _TitleTextColor = Color.FromArgb(0x88, 0x95, 0xE0);
  readonly Color _TitleBackgroundColor = Color.FromArgb(0xF1, 0xF9, 0xFF);
  readonly Color _TitleActiveTextColor = Color.FromArgb(0x88, 0x99, 0xE0);
  readonly Color _TitleActiveBackgroundColor = Color.FromArgb(0xD3, 0xD8, 0xFF);

  public override Color TextColor { get { return _MenuTextColor; } }
  public override Color BackgroundColor { get { return _MenuBackgroundColor; } }
  public override Color SelectedTextColor { get { return _MenuSelectedTextColor; } }
  public override Color SelectedBackgroundColor { get { return _MenuSelectedBackgroundColor; } }
  public override Color SelectedBorderColor { get { return _MenuSelectedBorderColor; } }
  public override Color BorderRightOuterColor { get { return _MenuBorderRightOuterColor; } }
  public override Color BorderRightInnerColor { get { return _MenuBorderRightInnerColor; } }
  public override Color BorderLeftOuterColor { get { return _MenuBorderLeftOuterColor; } }
  public override Color BorderLeftInnerColor { get { return _MenuBorderLeftInnerColor; } }
  public override Color BorderTopColor { get { return _MenuBorderTopColor; } }
  public override Color BorderBottomColor { get { return _MenuBorderBottomColor; } }
  public override Color TitleTextColor { get { return _TitleTextColor; } }
  public override Color TitleBackgroundColor { get { return _TitleBackgroundColor; } }
  public override Color TitleActiveTextColor { get { return _TitleActiveTextColor; } }
  public override Color TitleActiveBackgroundColor { get { return _TitleActiveBackgroundColor; } }
}
After implementing the ISmartTagItem and SmatTagPopupMenuColors, we need to pass them for the new Favorites SmartTagProvider. In the GetSmartTagItemColors event handler pass the SmatTagPopupMenuColors colors to event args:
private void smartTagProvider1_GetSmartTagItemColors(object sender, GetSmartTagItemColorsEventArgs ea)
{
  ea.PopupMenuColors = new FavouritesPopupMenuColors();
}
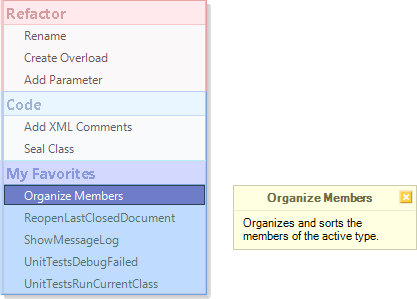
For the smart tag menu items – pass the names of the actions you would like to see in the menu, for example:
- UnitTestsRunCurrentClass
- UnitTestsDebugFailed
- ReopenLastClosedDocument
- Organize Members
- ShowMessageLog
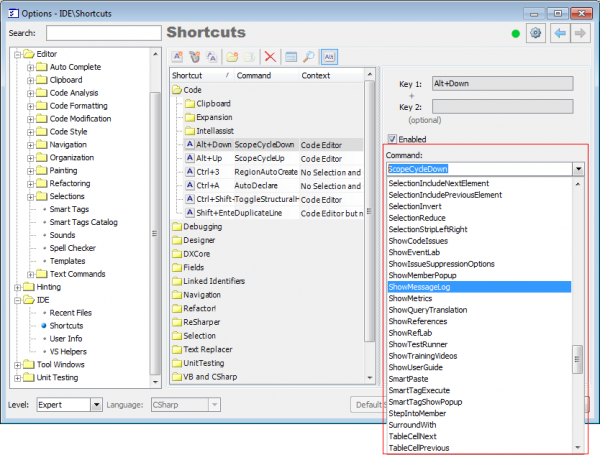
Available commands can be seen on the Shortcuts options page in the Options Dialog, for example. See the Command text box for any shortcut:
The remaining two event handler look like this:
private void smartTagProvider1_GetSmartTagItems(object sender, GetSmartTagItemsEventArgs ea)
{
  ea.Add(new ActionSmartTagItem("UnitTestsRunCurrentClass"));
  ea.Add(new ActionSmartTagItem("UnitTestsDebugFailed"));
  ea.Add(new ActionSmartTagItem("ReopenLastClosedDocument"));
  ea.Add(new ActionSmartTagItem("Organize Members"));
  ea.Add(new ActionSmartTagItem("ShowMessageLog"));
}

private bool smartTagProvider1_CheckSmartTagAvailability(object sender, EventArgs ea)
{
  return true;
}
Now, compile the plug-in, open Visual Studio IDE and test it. Here’s the Popup menu with the new My Favorites SmartTagProvider:
The code editor context menu:
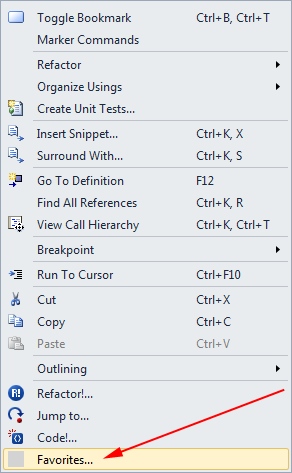
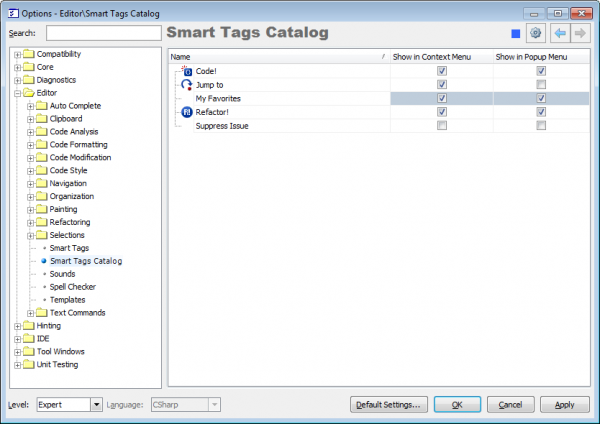
Don’t forget that the Popup menu can be configured on the “Editor | Smart Tags Catalog” options page in the Options Dialog:
The sample project is attached (20,144 bytes, Visual Studio 2010, CSharp).
—– Products: DXCore Versions: 10.2 and up VS IDEs: any Updated: Aug/30/2011 ID: D086Similar Posts:
- DXCore Components – SmartTagProvider
- How to manage the refactoring provider appearance and sub menus in the Popup menu
- Code Generation – Create Descendant and Create Descendant (with virtual overrides)
- How to add new menu entries to specific Visual Studio dropdown or context menus
- DXCore Services – Graphics
